How to read data from MySQL in Node-Red example
You can also check other posts on npm command deprecate option is deprecated
nodered MySQL tutorials
In my previous post, We discussed the basics ofNode red basic tutorials and installation..
This post is about How to get data from the MySQL database in node-red IoT applications.
Usually, the IoT application will interact with the database for storing and reading the data for dashboard-related analytics.
As you know, node-red is a flow-based programming language. In this everything is based on nodes.
To connect to the MYSQL database,
First, install the MySQL data node. this node is not available by default. Once you installed the node-red tool and started the node server.
Go to the dashboard page and the URL is localhost:1880 There are two ways to install MySQL nodes.
Use Manage palette option - dashboard:
Click the Top Right button, Click on the Manage Palette option. You will show UI like the below screen.
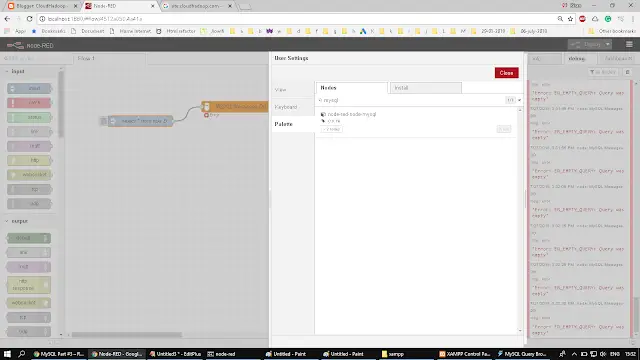
Install this node.
use Npm node-red-node-mysql:
node-red-node-mysql library provides support for node-red nodes for interaction with MySQL. This has an npm library
Install using the npm command
npm install node-red-node-mysql
Once the MySQL node is installed successfully, restart the node-red server via the command line. On accessing the admin dashboard, you can see the MySQL node on the left side navigation menu under the storage section as below.

Add a caption to it
Let us see the steps read from MySQL.
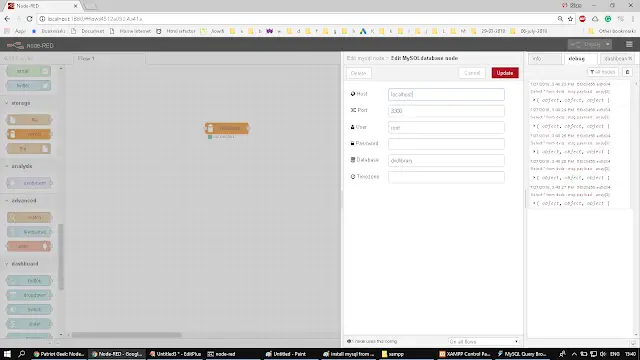
1. Drag the new MySQL node into the flow editor like the below screenshot. Configure the below things. Localhost, Port, Username, and password of a MySQL Database
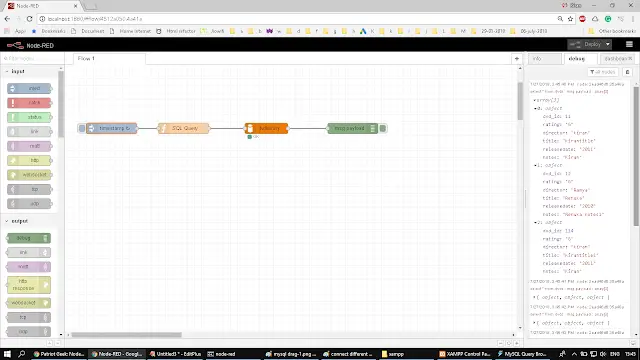
2.Drag function node. Configure function node to write SQL query

3. Drag inject input node and Debug output node into flow editor and connect nodes like the below.
Configure the inject node as a timer, so that it automatically initiates a request every 1 second of interval.
Debug output node is like a console log that prints the results to the console.
Connect different nodes as shown in the below screenshot.
You are ready to deploy changes once done. Clicking the Deploy button on the top right side will deploy changes. you can see the result records in debug tab as per the below screenshot.
Example summary
First, initiate timer request to function node which sends SQL query to MySQL node, this node outputs a list of records in the form of an array, that goes as payload into debut node which prints the data to debug tab.
You can replace it with debug node with your template that needs to define the data format as a table.