How to Install Subversion or SVN Client on Windows?
What is SVN and client
SVN is abbreviated as subversion.
SVN client is mostly used by software developers to do the svn based operations(creating a branch, Checkout and committing code, etc..).
This task is mostly done daily to make code changes on java projects.
How to Install SVN subversion?
The following are the steps required to install the svn server.
- First, try to get the required installation Exe file Apache Subversion Client v1.6.12 (for Windows) from collab’s site.
Once you downloaded the file, follow the following steps to install the svn client on windows.
1. click on CollabNet Subversion Command-Line Client v1.5.12.exe file and follow the instructions to install the client on your local box. This will install in the default folder in program files i.e Drive:\Program Files\CollabNet\Subversion Server.
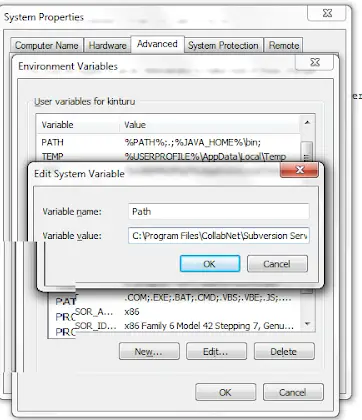
2. After installing the svn client, go to Environment Variables in System properties, please make sure that the “Drive:\Program Files\CollabNet\Subversion Server” value is added to the PATH variable. if PATH is not set, please add “%PATH%;.;Drive:\Program Files\CollabNet\Subversion Server” as value for the key “PATH”.

3. Svn version Command
Now SVN client is installed and ready to use.
Please open a command prompt and type the following command in the command prompt to test whether the svn client is properly installed or not.
svn --version
here is the result of the above command.

Command results in the correct version 5.2.14. so you are ready to use svn clients for doing more operations.
SVN install in Linux
Use the apt command to install subversion and dependencies.
You need sudo permission to run this command.
apt install subversion apache2 libapache2-mod-svn
Please run the below command.
$ svn --version
svn, version 1.9.12
Conclusion
You learned how to install svn and client in windows and Linux OS.
